计算机图形学编程笔记4
本笔记针对 GLSL-PathTracer源码学习
主要使用opengl实现
opencl: computing language 专注处理GPGPU情况,让显卡更能处理图形以外的计算, opencv, 图片分析的库,用于数字处理等。
一、各格式文件介绍
gltf:
https://zhuanlan.zhihu.com/p/65265611
https://github.com/KhronosGroup/glTF/blob/main/specification/2.0/figures/gltfOverview-2.0.0b.png

本质上是一个JSON文件。这一文件描述了整个3D场景的内容。它包含了对场景结构进行描述的场景图。场景中的3D对象通过场景结点引用网格进行定义。材质定义了3D对象的外观,动画定义了3D对象的变换操作(比如选择、平移操作)。蒙皮定义了3D对象如何进行骨骼变换,相机定义了渲染程序的视锥体设置。
glb文件: 二进制版的gltf
scene文件: 纯文件记录文件
hdr文件:环境贴图
二、第三方插件
- TinyGLTF: 加载gltf model文件
- Tinydir: https://github.com/cxong/tinydir 用于快速读取文件夹
- Tinyobjloader: https://github.com/tinyobjloader/tinyobjloader obj加载器
- stb: image加载器
- RadeonRays: 实现了一套bvh相关的框架
- oidn:开源渲染去噪系统Open Image Denoise(OIDN)
- imguizmo: Immediate mode 3D gizmo for scene editing and other controls based on Dear Imgui
- imgui: 实时GUI框架
- gl3w: 一个获取opengl函数地址的库(gl3w is the easiest way to get your hands on the functionality offered by the OpenGL core profile specification.)参考:https://blog.csdn.net/Weies/article/details/116103739
- SDL2: Simple DirectMedia Layer的缩写,相类似的有glfw,简单直接的多媒体层,不仅包括图像处理,音频处理,输入输出,还支持多线程和事件的开发,而且SDL是跨平台的。因为SDL开源性质,所以非常多的应用都是用SDL作为底层。参考: https://zhuanlan.zhihu.com/p/428302382
三、主体流程
- 加载Scene
- SDL创建主window,得到全局SDL_GLContext
- 初始化gl3w
- 初始化imgui,并与sdl和gl3w的对象绑定
- 初始化Renderer对象,shader的Program初始化也在这里
- 进入主循环UPDATE: MainLoop(window, context)
- 删除renderer对象,清理gl对象,sdl对象,删除窗口
四、MainLoop流程详细
-
while处理完所有SDL_Event
-
imgui大循环处理所有事件
-
Update 处理imgui的鼠标事件,最后执行renderer的Update:
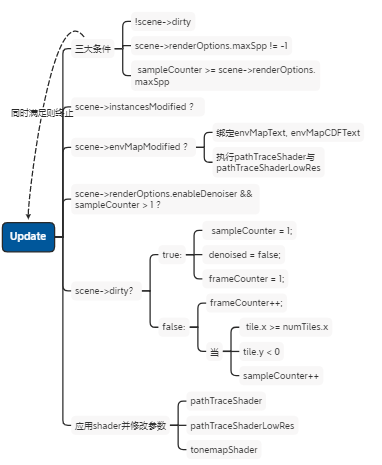
object的transform发生变动: scene->instancesModified?
更新transform, materials, BVH添加新的envMap时: scene->envMapModified? envmap的加载和shader应用 界面选项:scene->enableDenoiser? 应用oidn的Denoiser scene->dirty? 这里直接清空所有 gl buffer空间,准备re-render 没有dirty? 检测tile.y小于0时,这时帧率增加,表示已经渲染完一帧 更新Shader(Use, stopUse) -
执行Renderer渲染
Renderer类中的Quad负责绘制
scene->dirty?
应用 pathTraceShaderLowRes 绘制
没有dirty?
应用 PathTraceShader 绘制
应用 outputShader 绘制
应用 tonemapShader 绘制 -
SDL_GL_SwapWindow(window)
五、颜色空间
- Gamma校正: pow(x, 1/2.2) (颜色进行变亮) => 进入Linear空间
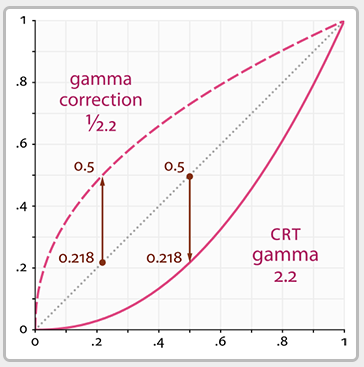
现在的CRT显示器都会对颜色自动进行2.2幂的处理,因此实际的颜色在显示器中显示会较弱,比如(0.5,0,0)到显示器中,显示出来实际是(0.218,0,0), 而想真正在显示器中显示(0.5,0,0),则需要输入(0.73,0,0)。
这里的0.73实际就是对0.5进行了Gamma校正
-
图片一般存储的都是线性空间的值。 Virtually all images (for diffuse textures) are stored gamma encoded. That means ^(1/2.2) was automatically applied before saving the file.
-
对于sRGB格式的图片,已经是存了一次gamma校正结果的颜色值。 We want to load textures as SRGB so OpenGL automatically does gamma decoding by applying ^2.2 (or equivalent, not exactly that as described in https://www.khronos.org/reg… ) so we can work in linear space in the rendering pipeline, which is more correct (better for lighting & post processing effects).
-
图片显示到显示器,需要记得对颜色值做一次Gamma校正(提亮),实际到CRT显示器会自动进行反校正。 Before sending our image to the monitor, we need to encode again to gamma space. That means applying ^(1/2.2). As I understand this is needed because all monitors nowadays automatically perform gamma decoding (^2.2 again) in order to be backward compatible. CRT monitors did that “automatically” because of issues in the technology (as explained in the tutorial).
对于Unity中, 如果选择了Gamma,那Unity不会对输入和输出做任何处理,换句话说,反gamma 、Gamma校正都不会发生,除非你自己手动实现。
如果选了Linear,那么就是上文提到的统一线性空间的流程了。对于sRGB纹理,Unity在进行纹理采样之前会自动进行反Gamma,对于Linear纹理则没有这一步。
而在输出前,Unity会自动进行Gamma Correction再让显示器输出。
 wechat
 alipay